Ten Tips to Take Better Pictures
March 23, 2018

Photo Credit: Mei Lamison/Achona Online
The first ever camera described in the history was a pinhole camera, which dates back to 4th or 5th century.
In today’s age of Instagram themes and Snapchat stories, everyone wants to take nice pictures. With the quality and accessibility of cameras improving, it’s no longer hard to get a high-quality photograph. However, there are still many techniques that are dismissed or overlooked when taking photos. Whether it be finding a new perspective or learning how to use a new setting on your digital camera, the possibilities for taking unique pictures are endless. Here are ten tips to take better pictures.
1. Try to find new perspectives
To give your pictures a new and interesting appeal to viewers, by capturing your subject from a different perspective. Don’t take the same picture that everyone else is taking. Try looking at your subject from a different angle. Try to make tall objects seem small, or tiny objects seem big. Whatever it is your trying to photograph, make your viewer see it from a viewpoint that wasn’t obvious to them before.
“Photography has opened my mind to new ideas through seeing things in different perspectives,” says photography student Rachel Brown (‘20).
2. Use depth of felid to your advantage

If you want your subject to stand out, like in the picture above, try setting your camera on a low f-stop such as f/4.
The depth of field in a photograph affects the focal range of your picture by changing your camera’s aperture. In other words, it controls how blurry or how clear the foreground or background of your picture will be. When taking pictures in manual mode, depth of field will be controlled by f-stops. The higher your f-stop, the clearer your picture will be. However, if you don’t want to use manual mode, you can set your camera to do this automatically. The landscape setting will give you a wide depth of field while the portraiture or close up setting will give you a shallow depth of field. If you would like to adjust your aperture semi-automatically, you can use aperture priority mode (Av).
3. Don’t be afraid to capture shadows or reflections
Most people try to avoid unwanted glares or shadows from their pictures. Instead of getting rid of these completely, try to use them to your advantage. Interesting light and shadow scenarios can make for a great composition. Not only will this unique perspective draw attention to your photograph, but it will also intrigue your viewers to take a closer look.
4. Use props
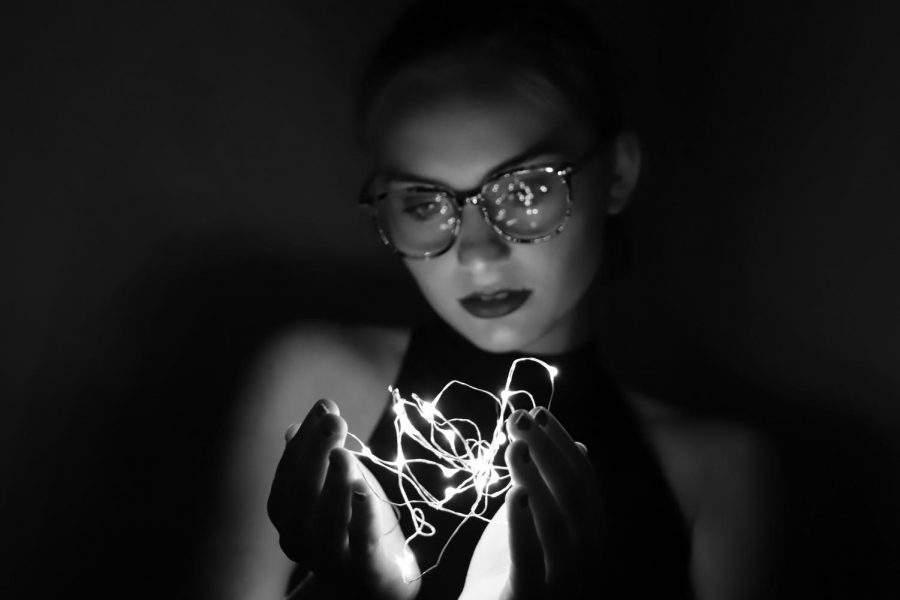
Experimenting with black and white settings on digital cameras can also add various values to photos.
When taking staged pictures, don’t be afraid to add props to your setting. Props can add an interesting composition to your picture, while also making it more intriguing to your viewer. They can also act as a tool to encourage your model to be more comfortable. Props can give subjects a little extra confidence or creativity when you’re capturing them. Whether it be a floppy hat, fairy lights or glasses, props can be a great addition to any image.
5. Try to use a slow shutter speed
Shutter speed is the amount of time the shutter on your camera is open while taking a picture. The shutter speed is measured in seconds and fragments of seconds. When capturing a subject in motion, the longer your shutter speed, the clearer your subject will be. Usually, most pictures will be taken with faster shutter speeds. However, a slower shutter can lead to some really interesting photos. A slower shutter will allow you to capture motion blur and movement. When taking pictures in manual mode, you can adjust your shutter to your liking. If you want your camera to do this automatically, sports mode will give you a fast shutter while portraiture mode will give you a slower shutter. If you want to control the shutter semi-automatically, you can use shutter priority mode (Tv).
6. Get creative with flash photography
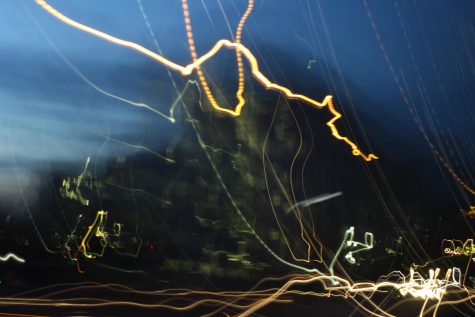
Not all DSLR or SLR cameras will have flash built into their body. However, most digital cameras will have some type of flash included.
The flash on your camera can be used for more than just night time shots. Flash photography can create interesting glares and sparks of light depending on your camera’s settings. For example, by using flash on a slow shutter speed, nighttime lights can appear to stretch out into long lines. Flash can create various shapes through any glass. Also, flash can make your subject stand out or appear luminous in dark settings.
7. Try framing subjects
To create an intriguing composition or add emphasis to your subject, you can try to frame them in your photograph. When framing, you draw attention to your subject by using props or backgrounds to capture them in a certain space. Not only will this create depth and add layers to your image, but it will also draw your viewers eyes directly to your focal point.
“We use framing in photography in many ways to improve our photos. I use framing a lot in my pictures because it draws attention to my subjects,” says photography student Isabela Mocsari (‘20).
8. Use the rule of thirds
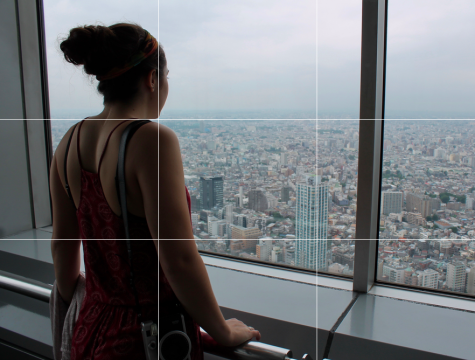
In the picture above, the rule of thirds is used in various ways. The horizon falls on the first horizontal line, while the subject falls on the first vertical line.
The rule of thirds is a basic principle that divides a picture’s composition by breaking it into thirds. The image is split both vertically and horizontally in order to create four lines and four focal points. If you place your subject or other areas of interest along these lines or intersections, the composition of your photo will become more balanced. The rule of thirds works with the composition to place interest points in a more natural way.
“Using the rule of thirds is a great way to improve your pictures. I used this method multiple times during the first semester of photography class,” says photography student Danielle Brennan (‘19).
9. Find creative settings
You don’t need to travel the world to take nice pictures. Try to be creative when looking for backgrounds. Places like your backyard or your neighborhood can act as great setting. Hanging a bed sheet on a wall at your house can act as a perfect backdrop for a photo shoot. Even your local craft store can have interesting settings if you look out for them.
“To find creative settings in my pictures, I thought about a lot of cool places in South Tampa. I wanted the background of the images to be aesthetic as well. My safe spot was UT. The old architecture and gorgeous scenery helped make any photo I took a good one,” says photography student Izzy Sebek (‘18).
10. Use Manual Mode
When you are first starting to take pictures on a DSLR or SLR, using automatic or semi-automatic modes are a great way to learn how to properly use your camera. Semi-automatic modes introduce photographers to the exposure triangle and design elements. However, once you fully understand how your camera works, it is more effective for you to start shooting in manual mode. By taking photos in manual mode, you have full control as to what you capture. You are controlling how much light enters, the time span, and your focal range. The camera is no longer doing any of the work for you. By taking a picture in manual mode, you are able to get your ideal photograph.
Sister Lisa • Mar 29, 2018 at 9:31 am
Great summary of tips and visuals, Mei! Your examples are well composed!